Customer Management
Your central hub for supporting customers—add new accounts, manage account details, balances, and memberships, and point shoppers to the right tools when they need a helping hand.
Accessing Customer Management
You can access the customer management interface in three ways from your admin panel:
- Click the arrow button (→) on the "Active Shoppers" card at the top of your admin dashboard
- Click the "Manage Customers" quick action button below the market status cards
- Click the "Manage Customers" button in the "Customer & Orders" section
Viewing Customers
The customer list provides a comprehensive view of all customer accounts in your market.
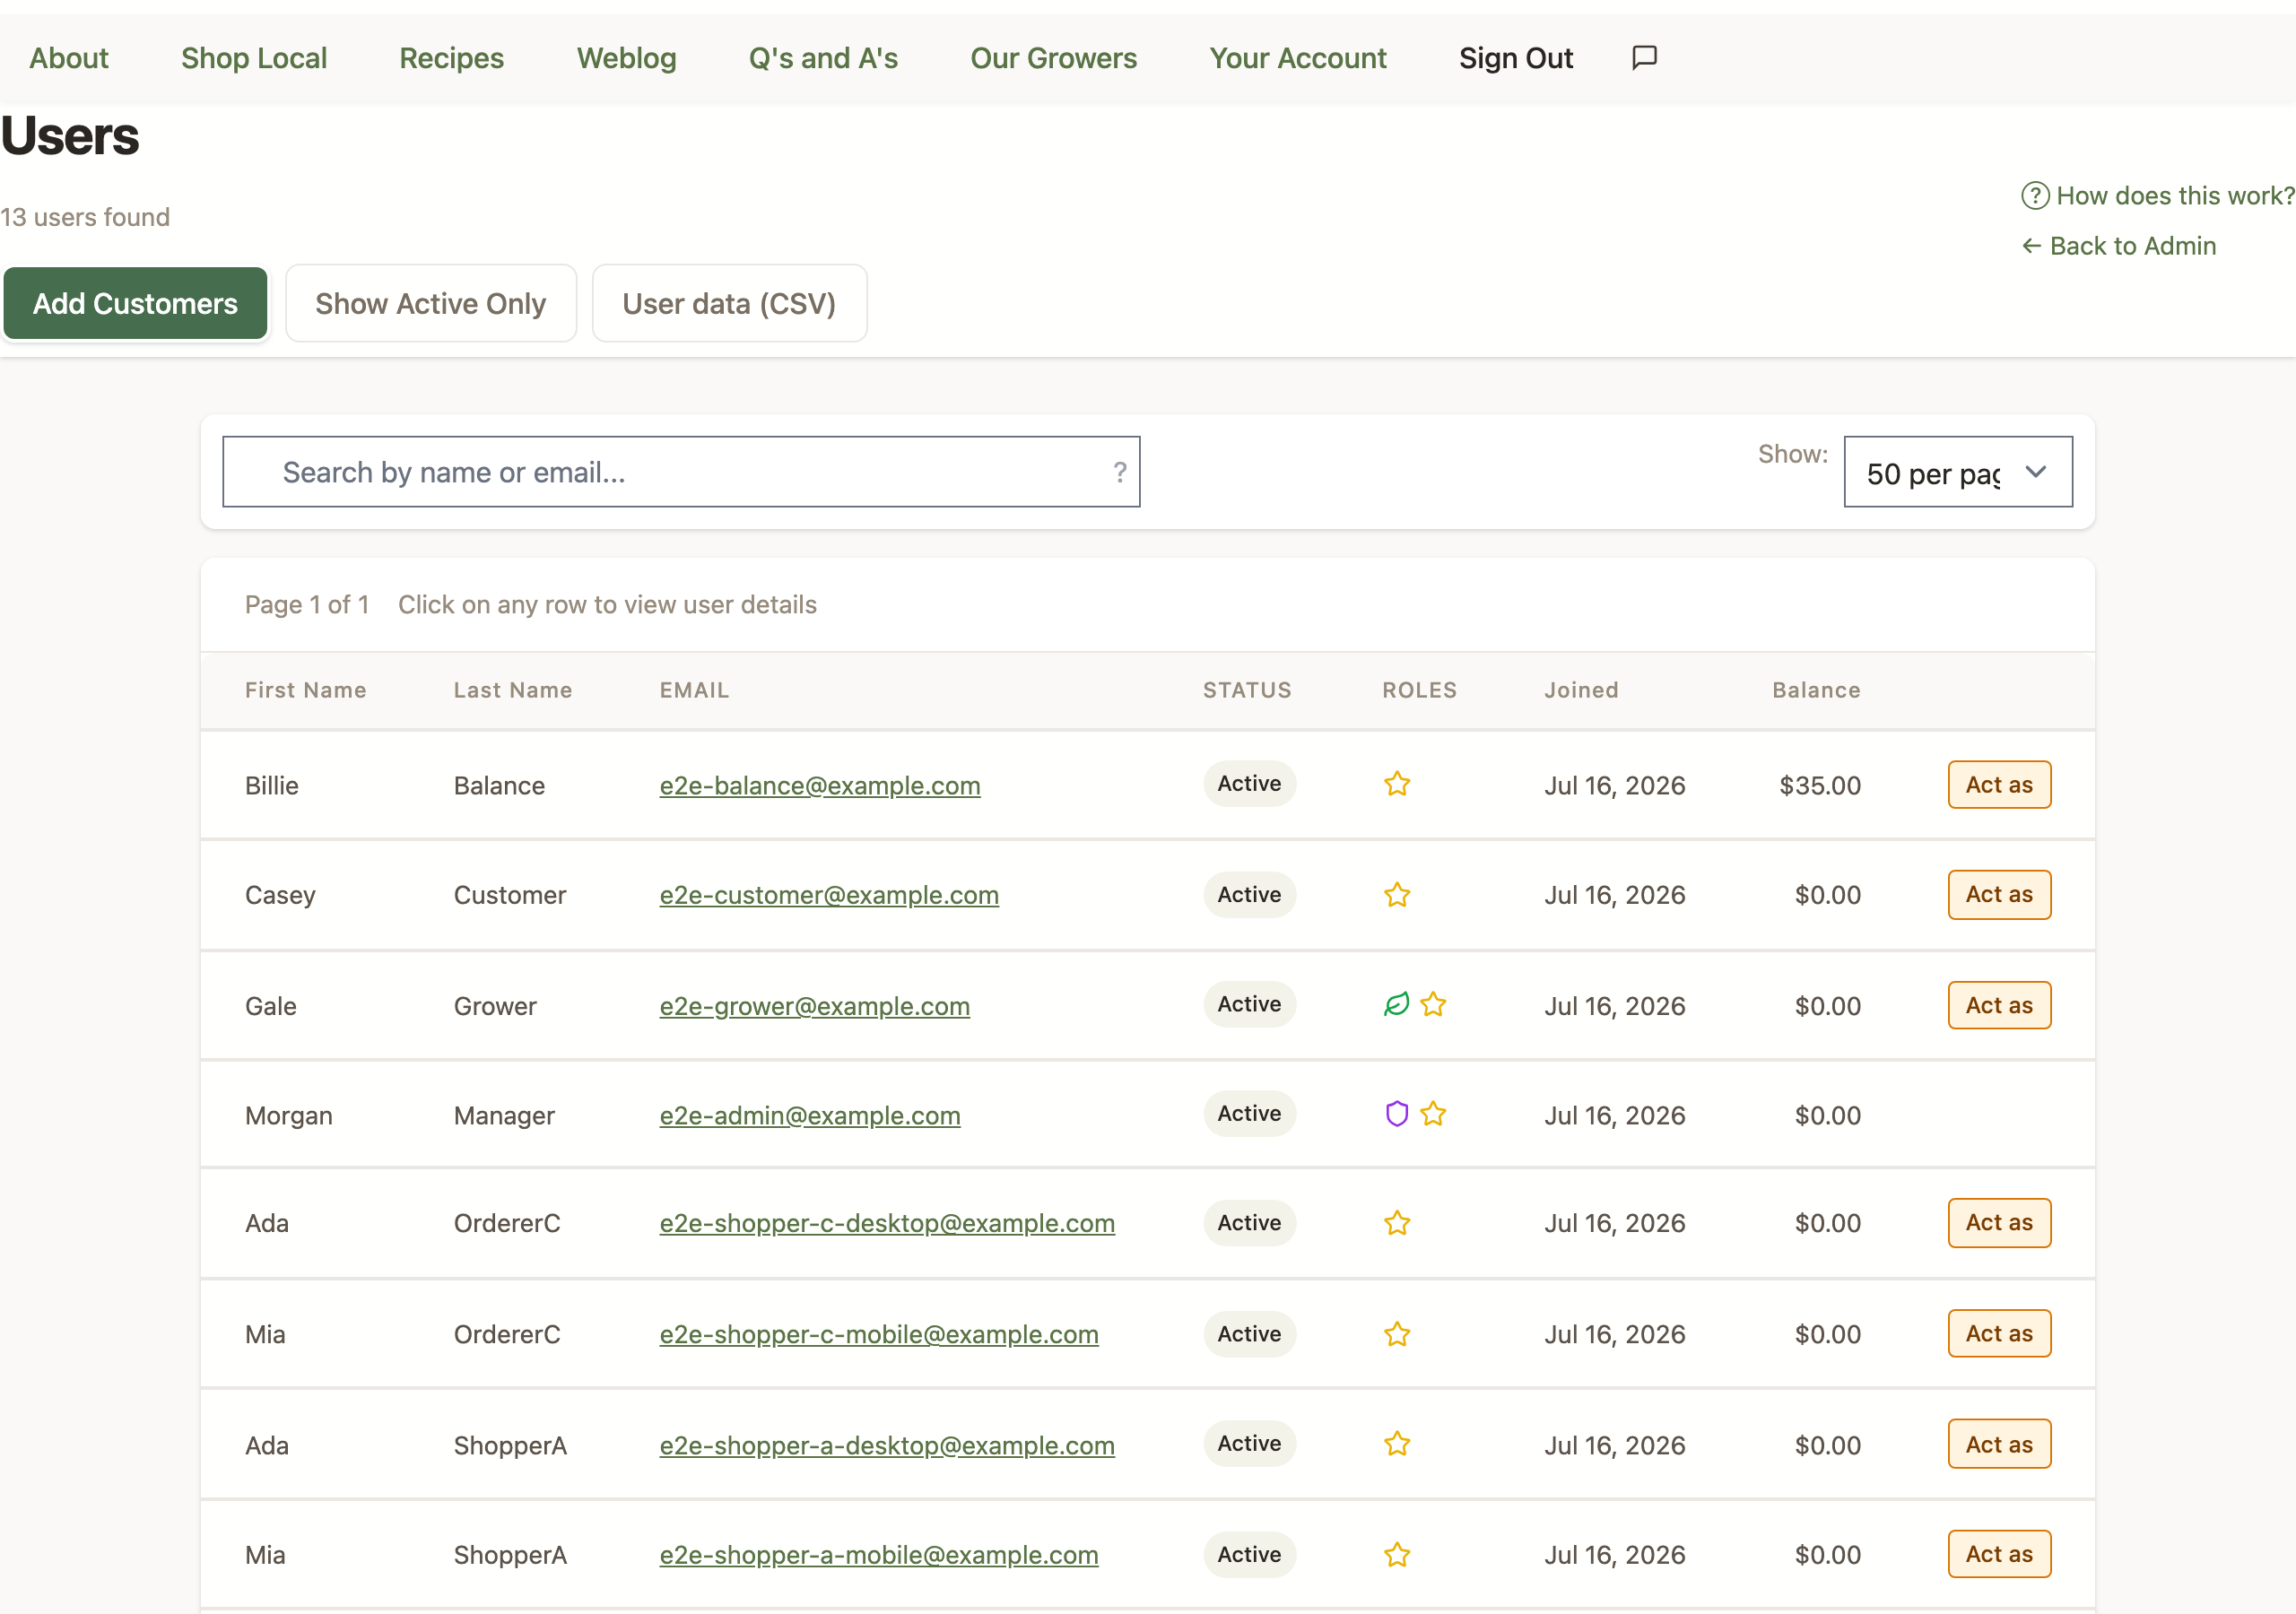
Customer List Features
- Search: Search by first name, last name, or email address
- Partial matches work (e.g., "Rob" finds "Robert")
- Email domain searches work (e.g., "hotmail" finds all "hotmail.com" users)
- Search one term at a time for best results
- Filtering: Toggle between showing all users or active users only
- Sorting: Sort by first name, last name, email, join date, or balance
- Click column headers to sort
- Click again to reverse sort order
- Pagination: View 50, 100, 200, 500, or 1000 customers per page
Customer Status Icons
Quick visual clues to understand your customers at a glance:
- Purple Shield: Another market manager (like you!)
- Red Heart: Market volunteer who helps out
- Green Leaf: Also sells as a grower
- Yellow Star: Current member (not expired)
- Blue Card: Payment method on file
- Orange Alert: Negative balance (needs follow-up)
- Gray Mail: Opted out of newsletters
Adding Customers
Customers usually create their own accounts, but sometimes you're the one holding the list—a signup sheet from a market day, a spreadsheet from a previous system, or a stack of email addresses from interested neighbors. The "Add Customers" button at the top of the customer list opens a window with three ways to get those people into your market.
Which Option Should I Use?
- You have their name and email: Create the account for them—use One at a time for a handful of people, or Upload a CSV for a whole list. The customer gets a welcome email and just sets a password.
- You only have email addresses: Use Send invitations. Each person gets an invitation email and creates their own account with their own details.
One at a Time
Create a single account on the spot—perfect when someone signs up at your market table:
- Click "Add Customers" and stay on the "One at a time" tab
- Enter their first name, last name, and email address
- Optionally add a phone number and pickup location (the pickup location choice only appears when your market has pickup locations enabled)
- Click "Create Account"
The account is created immediately, and the customer receives a welcome email right away. The form clears after each creation, so you can add several people back to back.
Upload a CSV
Bring in up to 200 customers at once from a spreadsheet:
- Click "Add Customers" and choose the "Upload a CSV" tab
- Prepare your file with these columns (a header row is required—there's a downloadable blank template right in the window):
- first name (required)
- last name (required)
- email (required)
- phone (optional)
- pickup location (optional—must match one of your market's pickup location names; capitalization doesn't matter)
- Choose your file and review the preview—every row shows its status before anything is created
- Click Import to create the accounts
Rows marked "Ready" will be imported. Rows with a problem—a missing name, an invalid email, a duplicate within the file, an address that already has an account, or an unrecognized pickup location—are simply skipped, and the preview tells you exactly why for each one. You can fix the file and upload it again, or import the good rows now and handle the rest later.
Send Invitations
When all you have is email addresses, let people sign themselves up:
- Click "Add Customers" and choose the "Send invitations" tab
- Paste up to 200 email addresses—one per line, or separated by commas or semicolons
- Optionally add a personal message (up to 1,000 characters) that's included in the email
- Click "Send Invitations"
Each address receives a branded invitation email with a link to create their own account at your market. After sending, you'll see a summary of what happened: invitations sent, addresses skipped because they already have an account, and any entries that didn't look like valid email addresses.
What the Customer Experiences
When you create an account for someone (one at a time or via CSV):
- They receive a welcome email with a one-time link to set their own password—you never see or share a password
- The set-password link is valid for 7 days
- Their username is their email address—that's what they sign in with
- If the link expires before they use it, no problem: they can click "Forgot password" on the sign-in page to get a fresh one
Invited customers (via the invitations tab) instead follow their link to the regular signup page and choose all their own details, including their password.
Customer Details Modal
Click any customer's name to see their full profile. Here you'll find everything you need to help them—from contact info and order history to balance adjustments and membership status.
| To do this... | Look here... |
|---|---|
| Extend membership | Membership Status Section → "Add A Year/Month" |
| Place an order for a shopper | Start an Act as session and check out in their seat |
| Update address | "Edit Customer Info" button |
| Make account inactive | Special Information Section → Uncheck "Active Account" |
Account Information Section
- Username: Customer's login username
- Email: Contact email (clickable to send email)
- Phone: Contact phone number
- Address: Full mailing address
- Pickup Location: Assigned pickup location (if enabled for your market)
Payment Information
When you've enabled Stripe payments, you'll see:
- Any saved payment methods (card type and last 4 digits)
- If the customer hasn't saved a card, this section shows "No saved payment method"
- Privacy Note: Full card numbers are never displayed for security
Membership Status Section
Manage customer membership (when membership is required):
- View current expiration date or trial orders remaining (some markets allow new customers to place a limited number of orders before requiring membership purchase)
- Add or remove time (months or years)
- Set specific expiration date
- Market managers and approved growers don't require membership
Recent Orders Section
View customer's order history:
- Order date (clickable to view full order details)
- Order price and applied balance
- Membership purchase indicator
- Scrollable list of recent orders
Cart Items
See what the customer has ready to order:
- Each item's name, quantity, unit, and price
- Total cart value
Need to help a customer finish their order? Use Acting as a customer to sign in as the shopper and complete checkout in their seat. You can also reproduce checkout problems they're seeing without asking them to walk you through it.
Account Balance Section
Manage customer account balance:
- Current balance displayed prominently
- Adjustment amount field (positive or negative)
- Quick reason selection or custom reason entry
- Apply to Open Orders: Check this to automatically apply the balance adjustment to reduce any outstanding balances on unpaid orders
- They've used "pay at pickup" and haven't paid yet
- An order was placed that exceeded their current account balance
- A correction or fee was applied to their account
Recent Adjustments Section
View balance adjustment history:
- Date, amount, and reason for each adjustment
- Clickable dates to view adjustment details
- Complete audit trail of balance changes
Grower Information Section
If the customer is also a grower, this section displays grower-specific information:
- Grower name and approval status
- Number of active products
- Grower account balance
User Comments Section
View and manage internal notes about the customer:
- Market manager comments visible only to administrators
- Edit comments when editing customer information
- Useful for tracking customer preferences or special circumstances
- Automatic deliverability comments: When the mail system turns off a customer's emails (a hard bounce, a spam complaint, or an unsubscribe), it automatically adds a dated comment here stating exactly what happened and when — for example, "Hard bounce on 5/31/2026, 2:14 PM. Disabling email notifications. Reason: mailbox full." See Why a customer stopped receiving emails below.
Customer Management Actions
Edit Customer Information
Update customer account details:
- Click "Edit Customer Info" button
- Update any of the following fields:
- First and last name
- Email address (required)
- Phone number
- Complete mailing address
- Pickup location assignment
- Internal market manager comments
- Click "Save Changes" to update
- Success message appears when saved
Adjust Account Balance
Add or subtract funds from a customer's account when they pay cash, receive a refund, or need a correction:
- Enter the adjustment amount
- Positive numbers add money (like cash payments)
- Negative numbers deduct money (like corrections or fees)
- Pick a reason from the dropdown, or type your own (this creates an audit trail)
- Check "Apply to all open orders" if this payment should cover pending orders
- Click "Adjust Balance"
- You'll see a success message, and the new balance appears immediately
Common Balance Adjustment Reasons
- Customer Paid Cash: Customer made cash payment
- Customer Paid Check: Customer paid by check
- Promotional Credit: Marketing or promotional credit
- Refund: Product issue or order cancellation refund
- Correction: Fix billing or calculation error
- Other: Custom reason entered by manager
Update Membership
Manage customer membership status (when membership is required):
- Select adjustment type:
- Add A Year
- Add A Month
- Remove A Year
- Remove A Month
- OR set specific expiration date using date picker
- Click "Update Membership"
- Membership status updates with confirmation
Update Special Information
Manage customer privileges and settings:
- Market Manager: Grant or revoke admin access
- Market Volunteer: Mark as volunteer (can help fulfill orders)
- Wholesale Account: Enable wholesale pricing
- Receives Mailings: Include/exclude from email newsletters
- Active Account: Enable/disable account access
- Line Position: Determines when customer's order is fulfilled if
products sell out
- Always first in line: Gets priority access to limited inventory (useful for volunteers or special cases)
- First come, first served (default): Normal ordering—first to order, first served
- Always last in line: Receives items only after other customers (rarely used)
Placing an Order for a Customer
When a shopper calls in, gets stuck at checkout, or needs a hand completing their order, use Acting as a customer to sign in as them and check out in their seat. It's the same experience they'd have on their own—browse products, adjust the cart, pick a pickup location, and submit the order—so you're not limited to whatever's already in the cart.
See the full Acting as a customer guide for how to start a session, what you can and can't do while acting, and how sessions are logged.
Delete Customer Account
Remove inactive customer accounts when appropriate:
Deletion Requirements
- Account must be inactive
- Customer must have NO orders in system
- Customer must have NO prepayments
Deletion Process
- Ensure account meets all deletion requirements
- Delete Account button appears in modal
- Click "Delete Account"
- Confirm deletion (cannot be undone)
- Account is permanently removed
Why a Customer Stopped Receiving Emails (and How to Fix It)
If a regular customer or grower tells you they've stopped getting emails — and their account shows "Receives Mailings" turned off even though they never unchecked it — the platform most likely turned it off on its own to protect your market's email deliverability. This is normal, and it happens quietly in the background.
LocallyGrown listens to delivery reports from the mail provider and reacts to three kinds of events. In every case it adds a dated comment to the customer's account (visible in the User Comments section of their detail view) that says exactly what happened and when:
- Hard bounce (the address permanently rejected the message — a typo, a closed mailbox, a full inbox, or a domain that refuses our mail): turns off Receives Mailings only. The account stays active and can still order and pick up. Comment: "Hard bounce on … Disabling email notifications. Reason: …"
- Spam complaint (the recipient marked one of our emails as spam): turns off mailings and deactivates the account. Comment: "Spam complaint on … Deactivating account."
- Unsubscribe (the recipient clicked the unsubscribe link): turns off mailings and deactivates the account. Comment: "Unsubscribed on … Deactivating account."
Re-enabling a customer's emails
You can turn emails back on yourself — you don't need to contact support. But fix the underlying cause first, or the address will just bounce again and the system will turn it right back off.
- For a hard bounce: confirm the email address on file is correct
(compare it with the customer; watch for typos like
.coninstead of.com). Correct it if needed. Then edit the customer and re-check Receives Mailings. - For an unsubscribe or spam complaint: the account was also deactivated. Only re-enable it with the person's clear OK — re-check both Active Account and Receives Mailings. Don't re-subscribe someone who reported your mail as spam without asking them first; doing so can hurt deliverability for your whole market.
Best Practices
Customer Service Tips
- Be responsive: Quick replies to balance and membership questions keep customers happy
- Document everything: Clear reasons for balance adjustments help everyone stay on the same page
- Remember preferences: Use manager comments to note things like "prefers text messages" or "allergic to nuts"
- Stay proactive: Check for negative balances weekly and reach out before they become an issue
Account Management
- Verify customer information is accurate, especially email addresses
- Keep pickup location assignments current
- Monitor membership expirations and send renewal reminders
- Use the active/inactive toggle rather than deleting accounts
Security & Privacy
- Only share customer information with authorized personnel
- Don't include sensitive information in market manager comments
- Verify customer identity before making account changes by phone
- Keep balance adjustment reasons professional and factual
Common Tasks
Extend Membership for Loyal Customer
- Open customer details
- Go to Membership Status section
- Select "Add A Year" or "Add A Month"
- Click "Update Membership"
- Notify customer of the courtesy extension
Fix Address for Customer
- Open customer details
- Click "Edit Customer Info"
- Update address fields
- Update pickup location if needed
- Click "Save Changes"
Mark Account Inactive
- Open customer details
- Go to Special Information section
- Uncheck "Active Account"
- Click "Update Special Info"
- Account is now inactive but preserved in system
Troubleshooting
Balance Adjustment Not Showing
- Verify adjustment was saved (success message appeared)
- Refresh the customer details modal
- Check Recent Adjustments section for confirmation
- Verify adjustment amount was entered correctly
Acting as a Customer Isn't Working
If you can't start a session or something isn't working once you're in the shopper's seat, see the troubleshooting notes in the Acting as a customer guide.
Customer Can't Login
- Verify account is marked as active
- Check email address is correct
- Send password reset link if needed
- Check if account was accidentally deleted
- If you created the account for them, remind them their username is their email address—and if their set-password link expired, they can use "Forgot password" on the sign-in page to get a new one