Managing Products
Learn how to create, update, and manage your product listings effectively
How to Add Products to Your Market
Adding products to your market is simple and intuitive. Follow these step-by-step instructions to list your first products for sale.
Step-by-Step: Adding Your First Product
- Navigate to the market page
From your market's site (e.g.,
yourmarket.locallygrown.net), click "Shop Local" in the navigation bar to access the market page where products are displayed and customers shop. - Enable Edit Mode
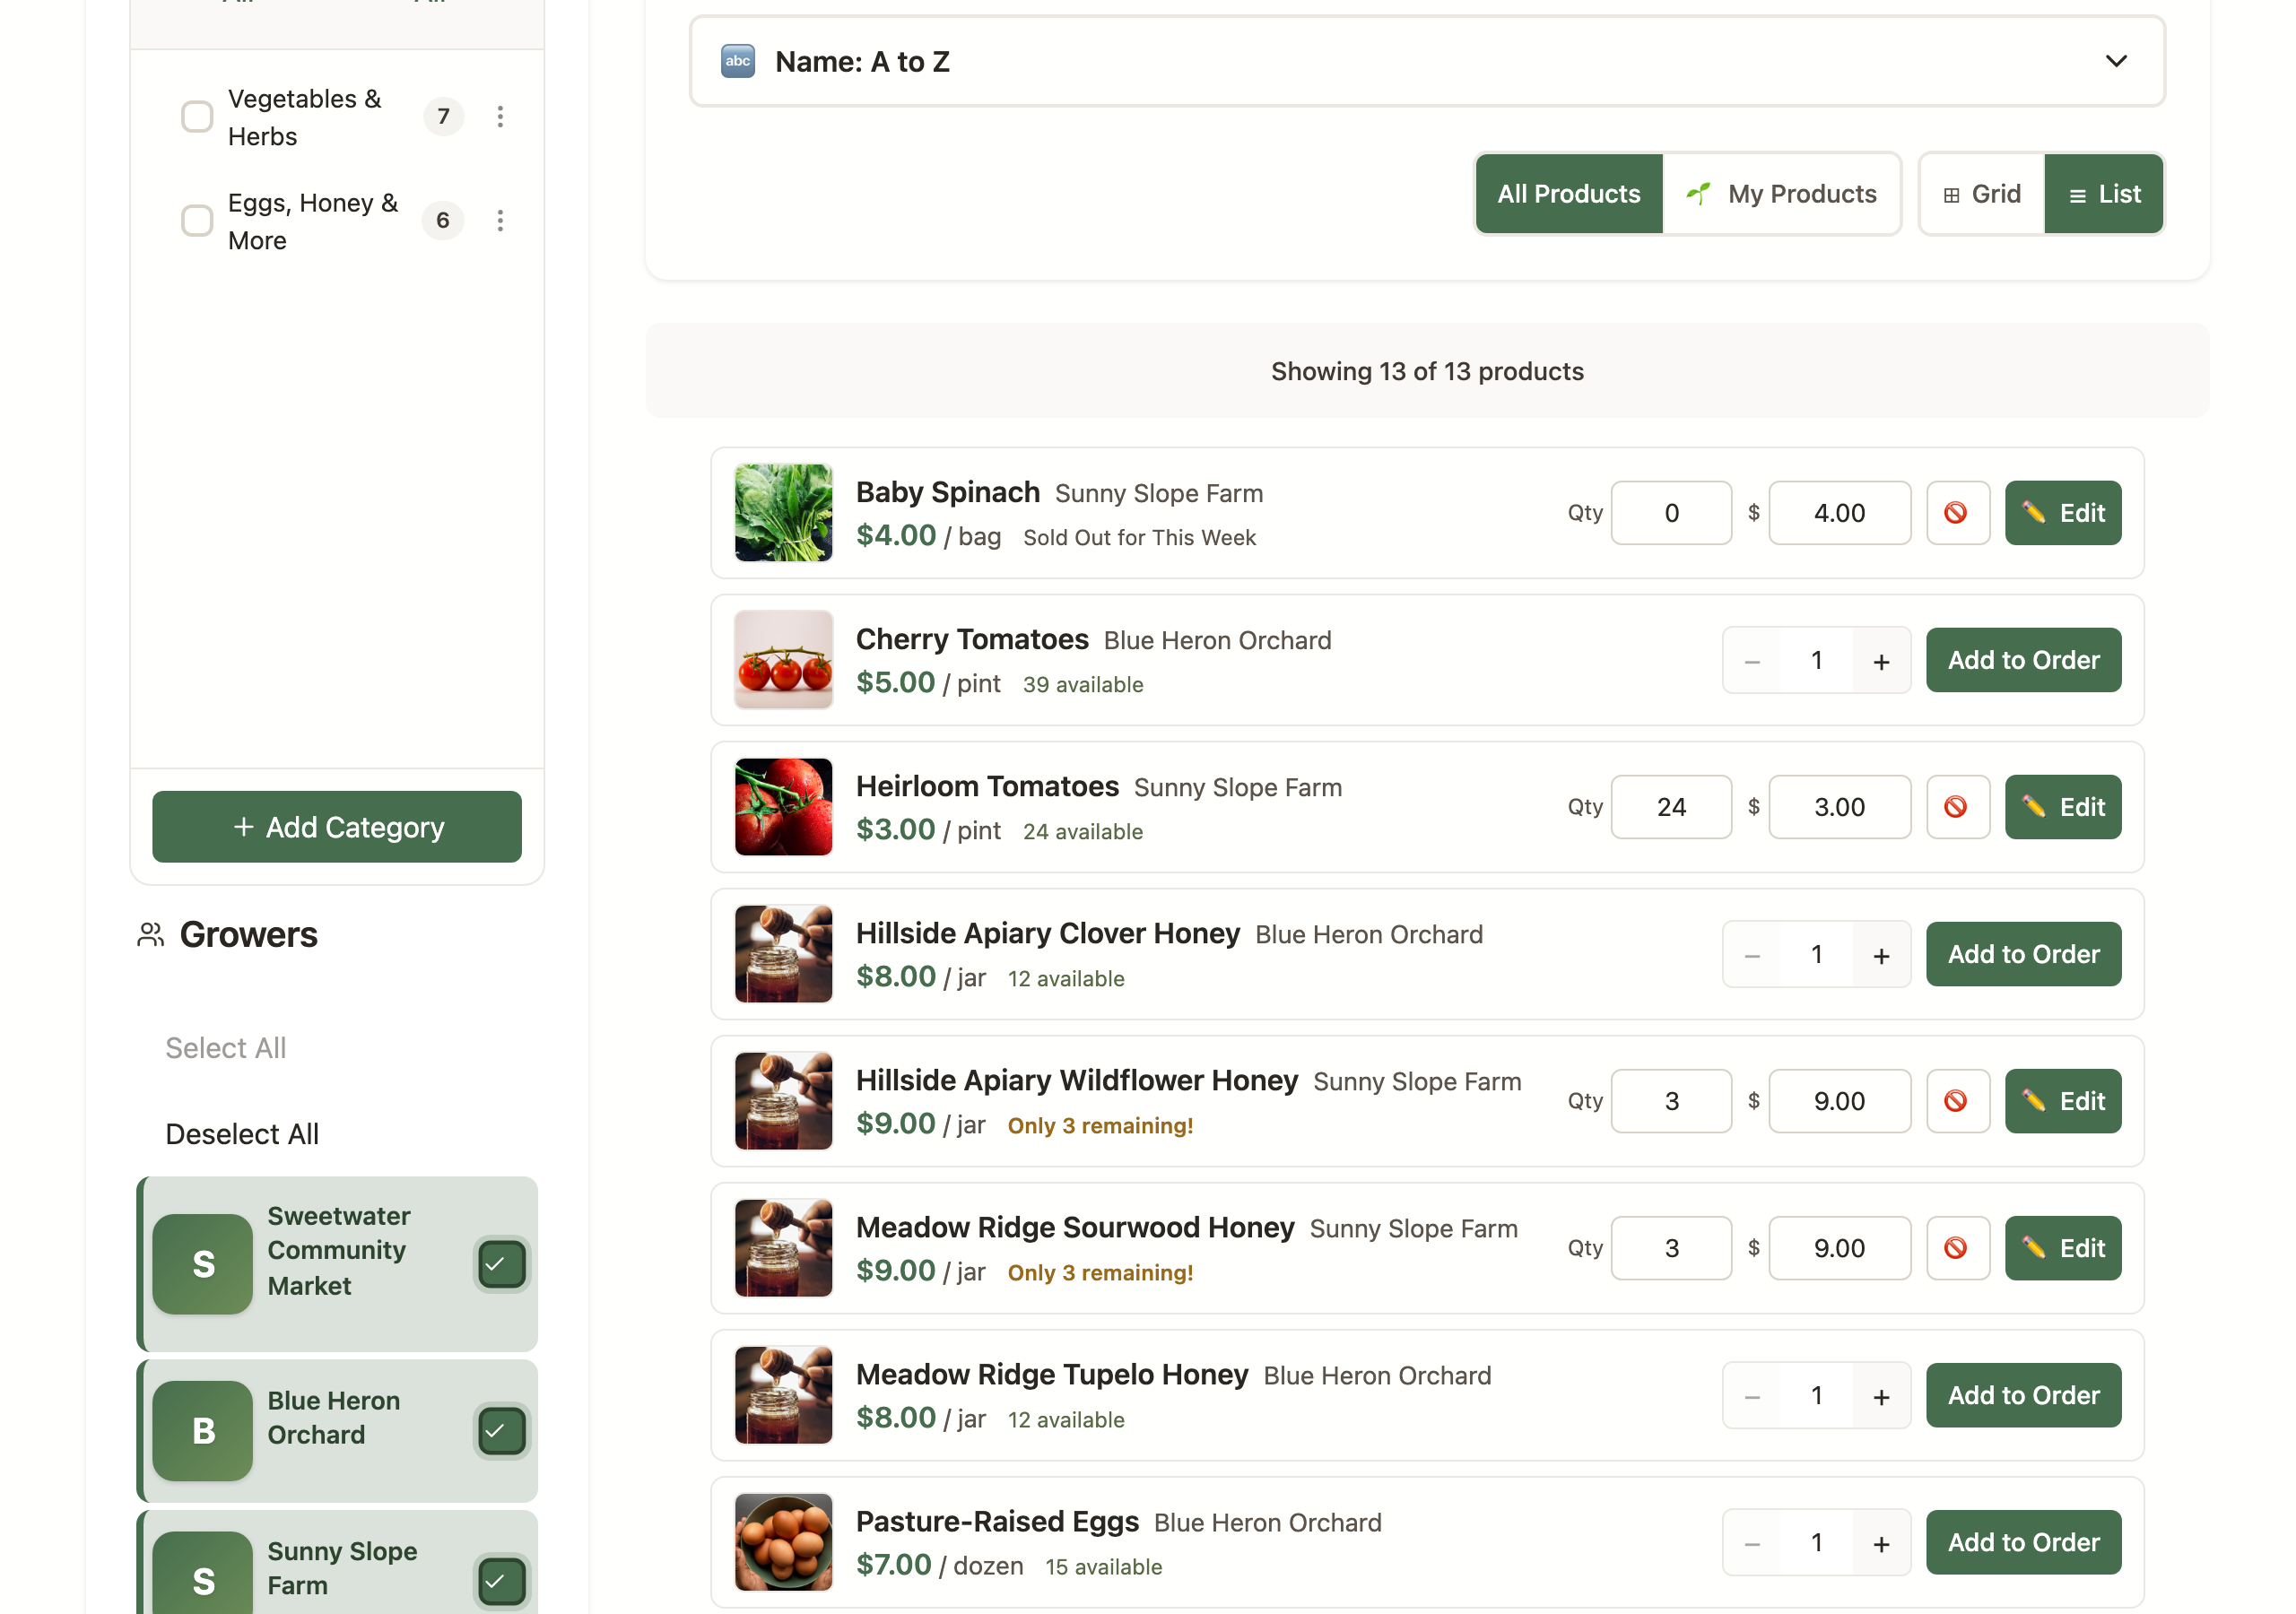
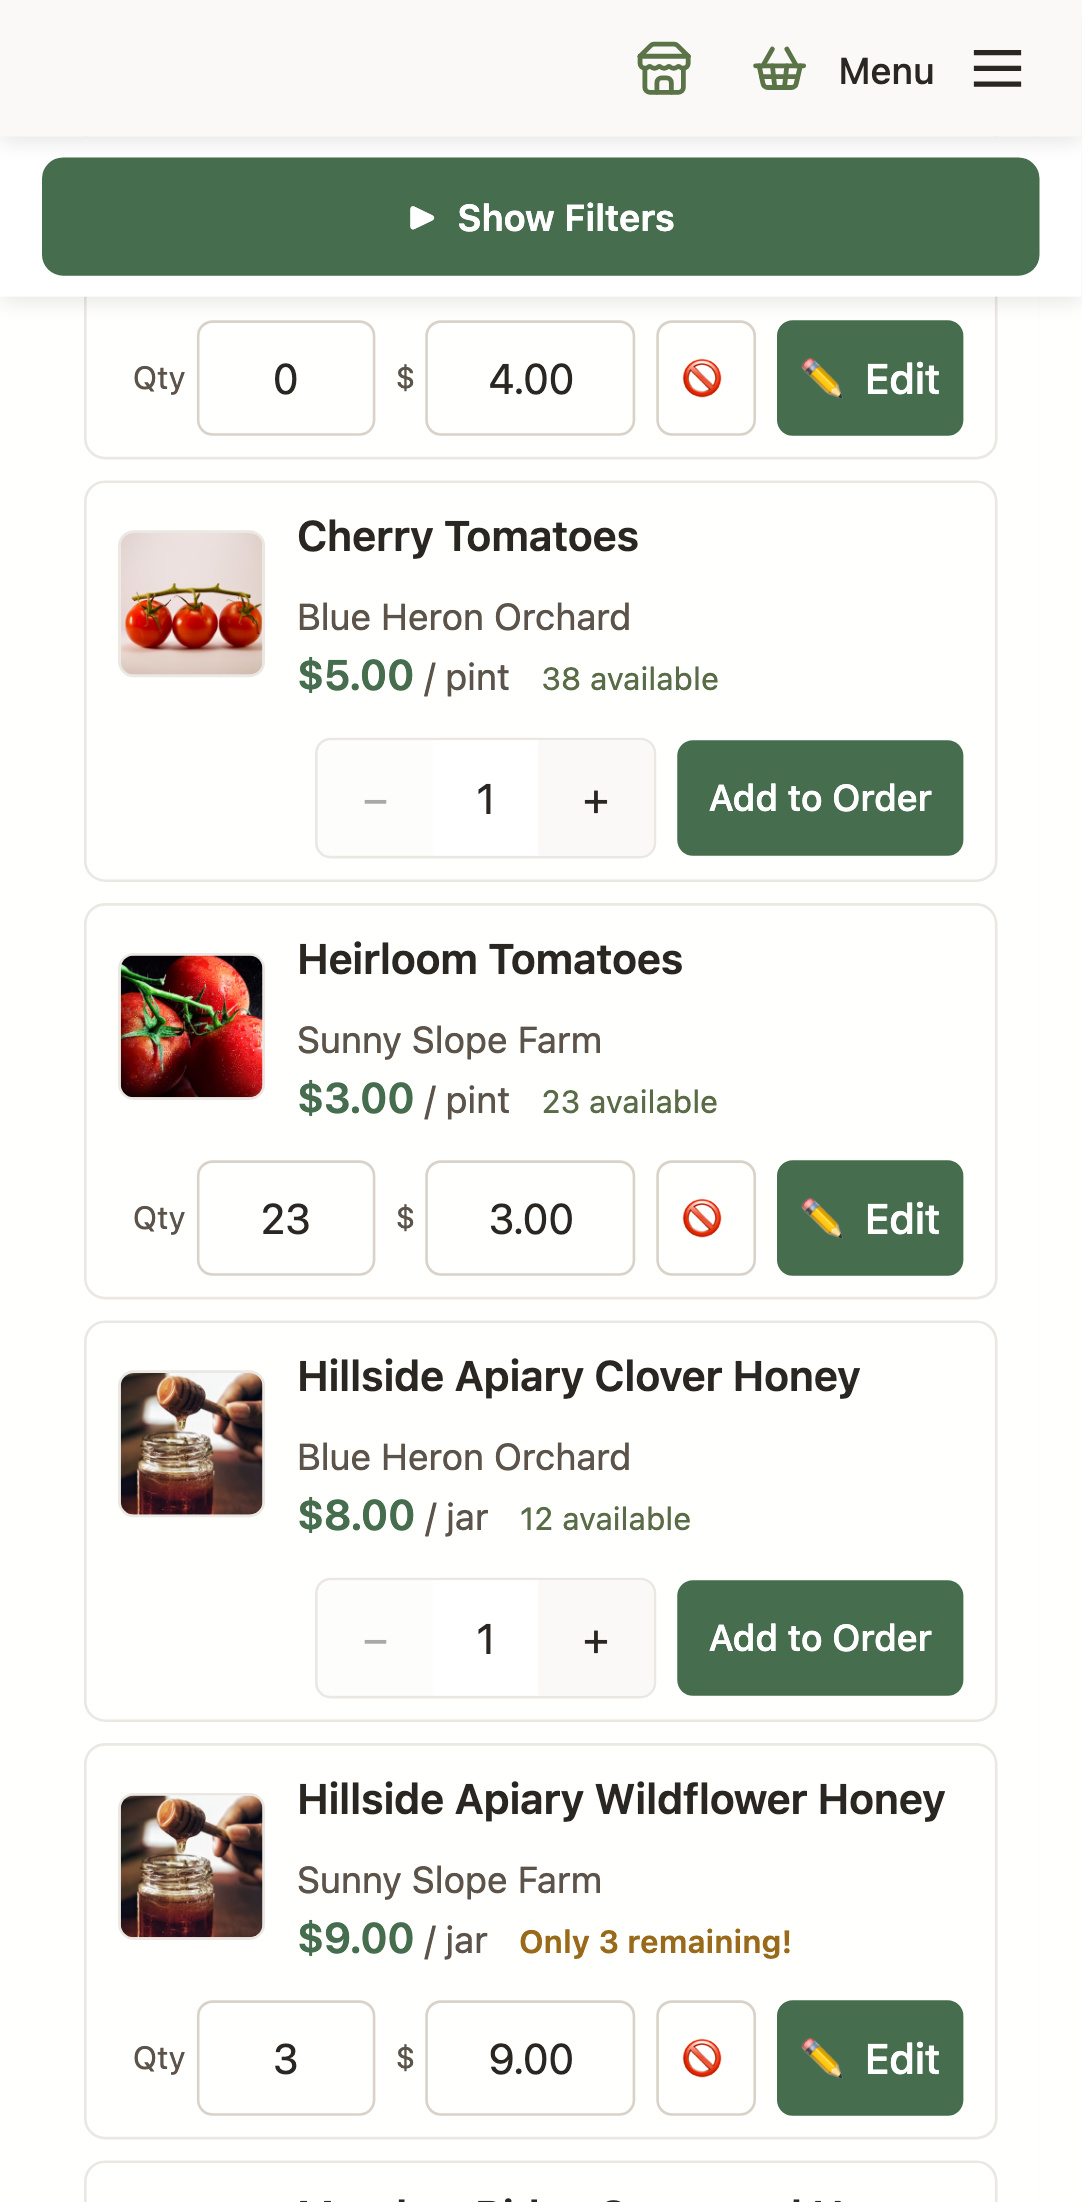
Look for the "Edit Mode" toggle switch in the bottom-right corner of the page. Click it to turn it ON. Edit Mode works in the compact list view too: each row shows quick inline fields for quantity and price (they save when you press Enter or tab to the next field) plus an availability toggle, and an "✏️ Edit" button opens the full form for name, description, photo, and more. It's a fast way to update quantities across your whole list on packing day.
- Select a category and click "Add Product"
This is the most important step! There is no general "Add Product" button visible until you select a category. You have two ways to add products to a category:
📌 Important: If a category has subcategories, you cannot add products to it directly. You must select a subcategory (the "leaf" category at the end of the tree). For example, if "Vegetables" has subcategories like "Leafy Greens" and "Root Vegetables", you must click into one of those subcategories first.⚠️ Critical: You will NOT see an "Add Product" button anywhere else. The button only appears when you're inside a category OR when you use the category menu. This is by design - products must be added to specific categories. - Fill in the product details
Complete the product form with your product information:
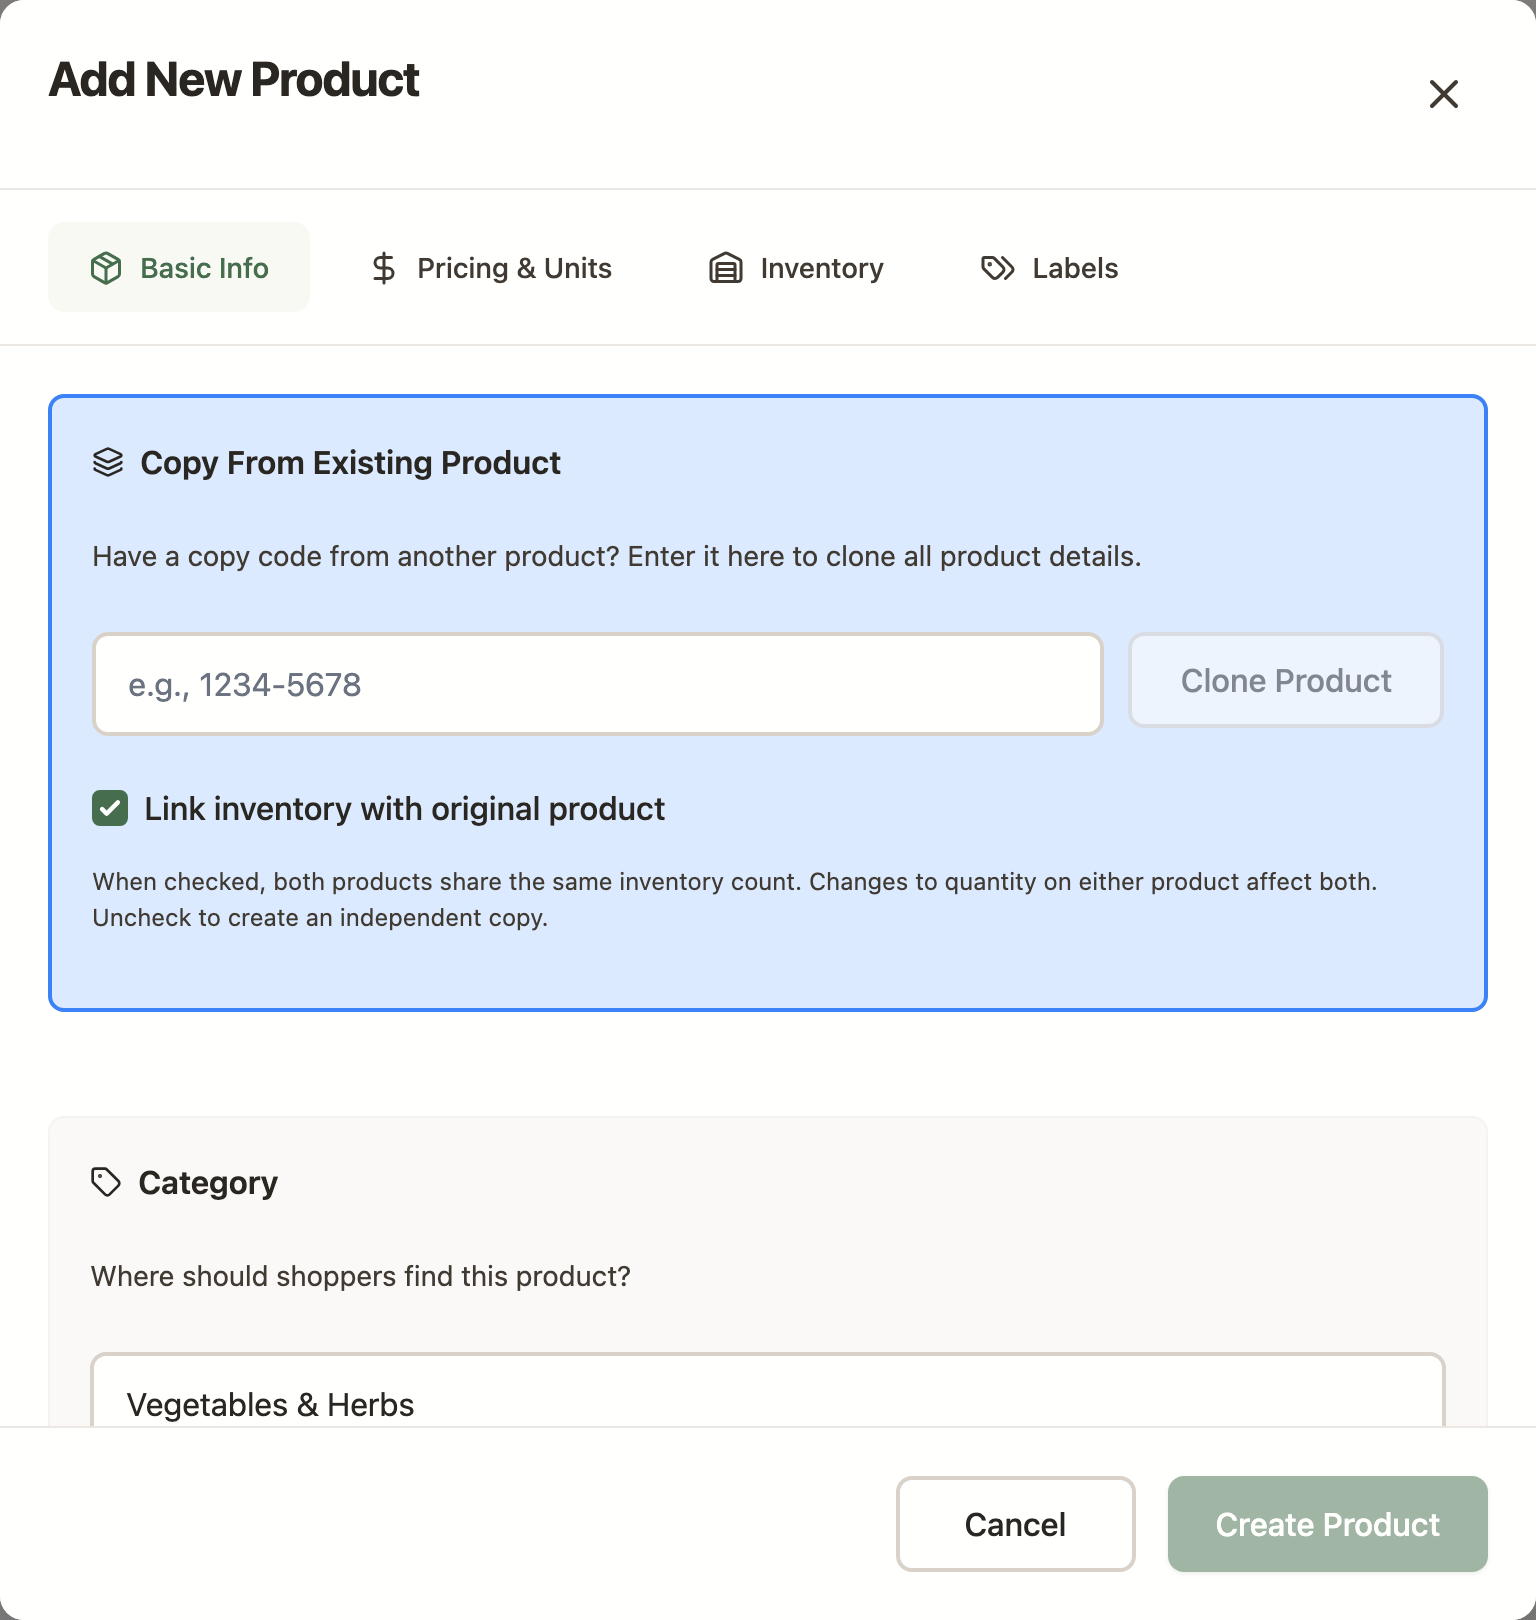
The Add New Product form. On a computer, the fields are grouped into tabs. 
On a phone, the same form is one scrolling column. - Product Name: Clear, descriptive name (e.g., "Organic Red Bell Peppers")
- Description: Include variety, growing methods, size, and serving suggestions
- Price: Price per unit (e.g., $3.50 per pound)
- Unit: How the product is packaged (e.g., "pound", "bunch", "dozen")
- Quantity Available: How many units you have for sale
- Category: Select the appropriate category from the dropdown
- Upload a product photo (optional but recommended)
Click the photo upload button and select a high-quality image of your product. Products with photos sell significantly better!
- Set product options (optional)
The product form is organized into tabs — Basic Info, Pricing & Units, Inventory, and Labels — so you can move through them as needed. (On mobile, every section is shown on one scrolling form.) Settings you may want to adjust:
- Special handling (Basic Info): check Requires refrigeration, Cut flowers, or Live plant so we handle your items correctly at pickup.
- Wholesale pricing (Pricing & Units): if your market allows it, turn on Allow wholesale pricing and set a wholesale price. Retail orders are filled first.
- Stop accepting orders when sold out (Inventory): check this when your quantity is exact and you can't replenish.
- Don't print labels for this product (Labels): for items like corn, CSA subscriptions, or books that don't need a label. Otherwise you can adjust the Label Grouping Threshold.
Featured products: you can feature your own products from the product card itself (not from this form) — with Edit Mode on, open the management menu on your product and click ⭐ Make Featured. Each grower can have up to five featured products per market. If you're already at five and feature a sixth, the oldest one is automatically unfeatured to make room. - Click "Create Product"
Review your information and click the "Create Product" button at the bottom of the form. Your product will be saved and immediately visible to customers!
- Verify your product appears
Your new product should now appear on the market page. You can toggle Edit Mode OFF to see how customers will view it, or leave it ON to add more products.
Quick Troubleshooting
🚨 "I can't find the Add Product button!"
The correct way to add products:
- Make sure you're on the market page (click "Shop Local" in the nav bar)
- Enable Edit Mode (toggle in bottom-right corner)
- You MUST select a category first - either by:
- Clicking on the category name to view it, then clicking "Add Product"
- Right-clicking the category name (or clicking the ⋮ icon), then "Add Product"
The "Add Product" button only appears when you're viewing a specific category or using the category menu. This is intentional - products must belong to a category.
Don't see the "Edit Mode" toggle?
- Make sure you're logged in to your account
- Verify that you've been approved as a grower in this market
- Contact your market manager if you still don't see it
Can't select a category?
- Your market might not have categories set up yet. Contact your market manager to add categories first.
- If you're a market manager, see the Market Settings guide for setting up categories.
Don't see "Add Product" button in Edit Mode?
- Most common issue: You need to select a category first! Click on a specific category in the left sidebar or category list. The "Add Product" button only appears when you're viewing a category.
- Category has subcategories? If a category has subcategories (like "Vegetables" with "Leafy Greens" and "Root Vegetables"), you cannot add products to the parent category. You must drill down and select a subcategory at the end of the tree first.
- Make sure Edit Mode is actually ON (the toggle should be highlighted/active)
- Try refreshing the page
- Clear your browser cache and try again
- If the issue persists, contact your market manager or LocallyGrown support
Product not showing up after creation?
- Turn OFF Edit Mode to see the customer view
- Check if the product is marked as "Active" (edit the product to verify)
- Make sure the quantity is greater than 0
- Check that the product is in a valid category
Creating Great Product Listings
Now that you know how to add products, let's make sure your listings are compelling and effective.
Essential Product Information
- Product Name: Clear, descriptive name (e.g., "Organic Red Bell Peppers" not just "Peppers")
- Description: Include variety, growing methods, size, and serving suggestions
- Price: Set competitive prices that reflect quality and growing costs
- Unit Size: Clear packaging (1 lb bag, 6-count, bunch, etc.)
- Quantity Available: How many units you have for sale
- Category: Help customers find your products easily
Product Categories
Organize your products into logical categories:
- Vegetables: Fresh produce, root vegetables, leafy greens
- Fruits: Tree fruits, berries, melons
- Herbs: Culinary herbs, medicinal herbs
- Dairy: Milk, cheese, yogurt, butter
- Meat & Poultry: Beef, pork, chicken, eggs
- Baked Goods: Bread, pastries, preserves
- Prepared Foods: Ready-to-eat items
- Plants & Flowers: Seedlings, cut flowers, potted plants
Product Attributes and Options
Each product has a small set of flags and fields that change how it's priced, labeled, and handled at pickup. These are the ones that actually exist in the platform.
Special handling flags
Set in the product editor (Basic Info tab):
- Requires refrigeration (
cold) — marks the product as needing cold storage between harvest and pickup. Managers see this flagged on packing and pickup lists. - Cut flowers / bouquet (
bouquet) — marks the product as a cut-flower or arrangement, so pickup-day handling reflects that (kept in water, not packed with produce, etc.). - Live plant (
plant) — seedlings, potted plants, and trees. Like bouquet, handled separately at pickup.
These flags are purely informational — they don't change pricing or availability, they just tell everyone downstream (managers, packers, customers) how the item should be treated.
Labels
Set in the product editor (Labels tab):
- Don't print labels for this product (
skipLabels) — for items like ears of corn, CSA subscriptions, or books, where a label per unit doesn't make sense. The packing report still includes the item; only the printed harvest label is suppressed. - Label grouping threshold (
groupLabels, default 10) — when a customer orders more than this many units of the product, the label is printed once with the quantity rather than once per unit. Tune up for bulk items (eggs, small produce), down for items you want a separate label on every time.
Wholesale pricing
If your market allows it (Manager setting), you can turn on Allow wholesale pricing (allowsWholesale) on a product and
set a separate wholesale price (wholesalePrice). Customers
flagged as wholesale in the market see the wholesale price; everyone else sees the retail
price. Retail orders fill first from the same inventory pool, then wholesale.
Inventory control
- Quantity available — the master count. When it hits zero, customers can still see the product but can't add it to their order (unless you've unlocked "stop at zero" — see next item).
- Stop accepting orders when sold out (
stopAtZero) — when on, the product is automatically hidden from shoppers the moment its quantity hits zero. Good for items where you can't replenish mid-week. Leave off when you want the product to stay visible and let the quantity dip negative. - Active / inactive — toggle a product off to hide it from shoppers without deleting it. Useful for out-of-season items you'll reactivate later.
Inventory Management
Keep your inventory accurate to prevent overselling and disappointed customers.
Inventory Tracking Methods
- Exact Quantities: Set specific numbers available (12 heads of lettuce)
- Estimated Quantities: Approximate amounts for bulk items (20 lbs of tomatoes)
- Stop-at-Zero: Automatically disable product when sold out
- Manual Control: Turn products on/off as needed
Availability Management
- Weekly Planning: Review what will be ready for harvest
- Set Availability: Mark products as available early in ordering cycle
- Monitor Orders: Watch sales throughout ordering window
- Adjust Quantities: Increase or decrease based on harvest reality
- Disable if Needed: Turn off products if harvest comes up short
Best Practices for Inventory
- Start with conservative quantities until you understand demand
- Check your listings daily during ordering windows
- Communicate early if you need to reduce quantities
- Keep a buffer for quality issues or harvest shortfalls
- Document what sells well for future planning
Product Photos and Presentation
High-quality photos significantly increase sales and customer satisfaction.
Photography Guidelines
- Natural Lighting: Take photos outdoors or near windows
- Clean Backgrounds: Use plain backgrounds that don't distract
- Multiple Angles: Show products from different perspectives
- Size Reference: Include hands or common objects for scale
- Packaging View: Show how products will be packaged
- Lifestyle Shots: Occasional photos showing products in use
Photo Requirements
- File Format: JPG or PNG files
- Size Limits: Maximum file size varies by market settings
- Resolution: High enough for clear viewing on mobile devices
- Orientation: Square or landscape orientation works best
Updating Photos
- Update photos seasonally to show current products
- Replace photos if product appearance changes significantly
- Add new photos when introducing product variations
- Remove photos for discontinued products
Product Descriptions and Marketing
Compelling descriptions help customers understand and connect with your products.
Writing Effective Descriptions
- Start with Benefits: What makes this product special?
- Include Variety Details: Specific cultivars, breeds, or types
- Mention Growing Methods: Organic, pasture-raised, heirloom, etc.
- Suggest Uses: Cooking methods, recipes, storage tips
- Share Your Story: Brief details about your farming practices
Description Examples
❌ Poor Description
"Tomatoes, $4/lb"
✅ Great Description
"Cherokee Purple Heirloom Tomatoes - These deep purple beauties have a rich, smoky flavor perfect for slicing. Grown organically in our heritage garden. Each tomato weighs 8-12 oz. Great for sandwiches or caprese salad. Store at room temperature for best flavor. $4/lb"
Seasonal Marketing
- Spring: Emphasize freshness, first harvests, spring cleaning
- Summer: Peak season, abundance, preservation, entertaining
- Fall: Harvest celebration, storage crops, comfort foods
- Winter: Greenhouse goods, preserved items, hearty meals
Managing Orders and Fulfillment
Once customers place orders, you'll need to prepare and deliver their products.
Order Review Process
- Check Orders Daily: Monitor what's been ordered
- Confirm Availability: Verify you can fulfill all orders
- Communicate Changes: Contact customers about substitutions
- Plan Harvest: Schedule picking based on orders
- Prepare Products: Wash, package, and label as needed
Order Modifications
If your market allows grower order editing, you can:
- Adjust Quantities: Reduce if harvest comes up short
- Make Substitutions: Offer similar products with customer approval
- Add Notes: Communicate with customers about changes
- Remove Items: Delete products you can't fulfill
Packaging and Labeling
- Clear Labels: Customer name and product description
- Secure Packaging: Prevent damage during transport
- Temperature Control: Use coolers for perishable items
- Professional Appearance: Neat, clean presentation
Multi-Market Product Linking
If you sell in multiple LocallyGrown markets, the copy code feature helps you link products across markets to share inventory and simplify management.
What is a Copy Code?
Every product has a unique copy code that identifies it. This code lets you clone a product from one market to another, copying all its details (name, description, price, photos, etc.) so you don't have to re-enter everything.
Finding Your Product's Copy Code
- Go to your market's product page
- Enable edit mode (usually by clicking "Edit Products" or similar)
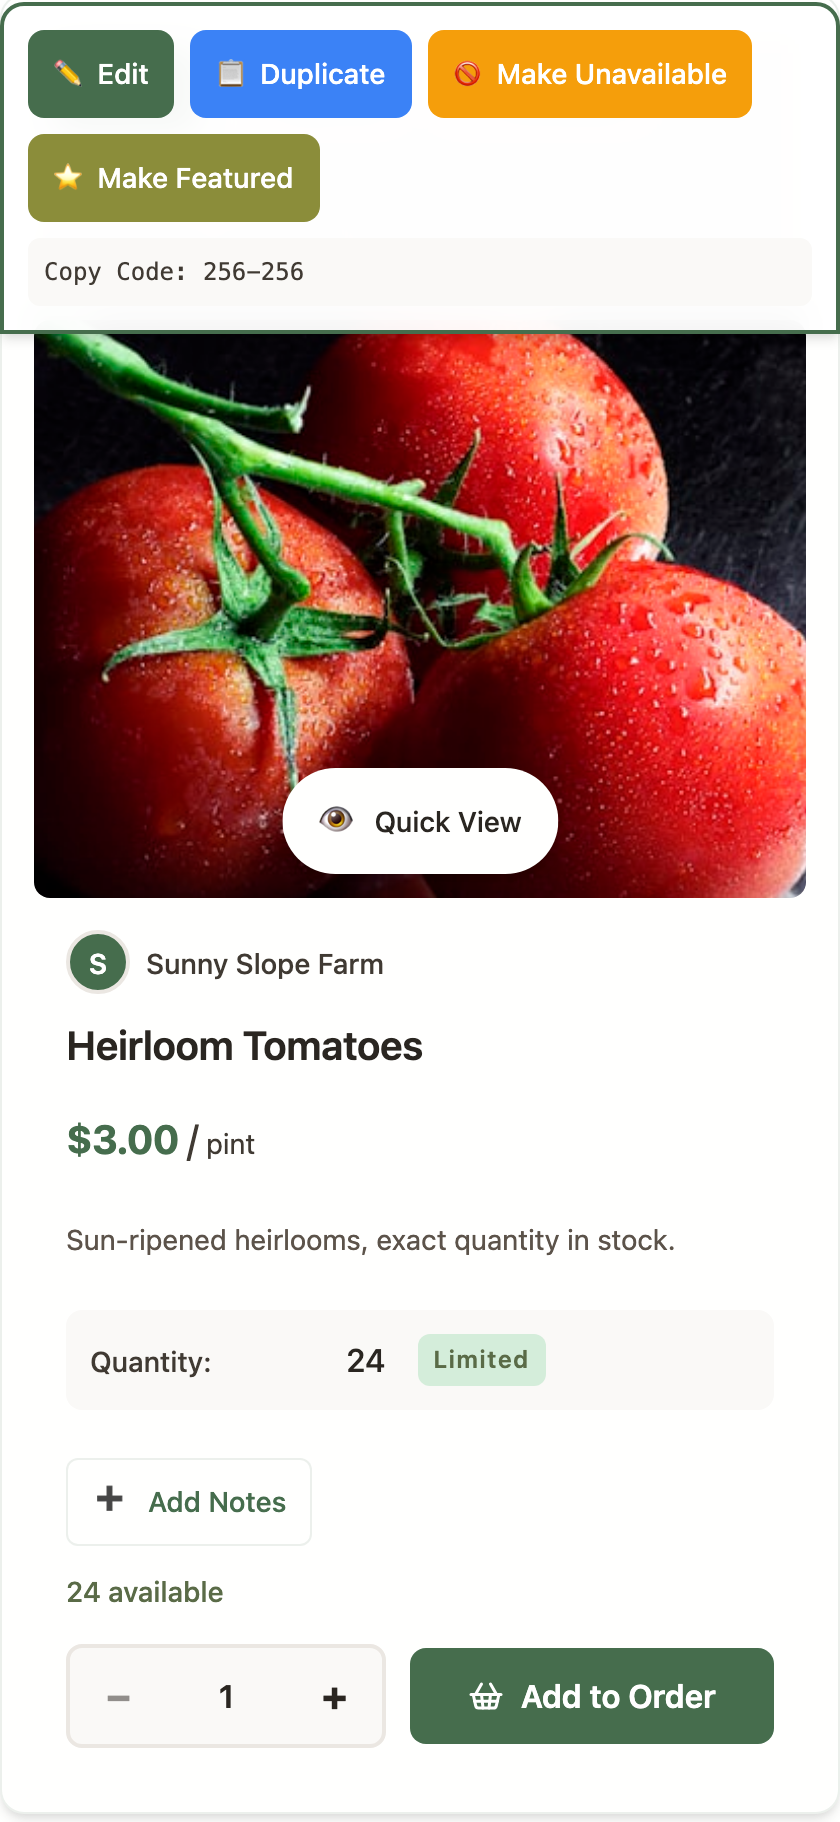
- Look for the copy code displayed below the product's edit buttons
- The code looks like this:
12345-67890
Cloning a Product to Another Market
Use this when you want to add the same product to a different market:
- Copy the copy code from your original product
- Log in to the other market where you want to add the product
- Click "Add New Product" or similar
- Look for the "Copy From Existing Product" field at the top of the form
- Paste your copy code into this field
- Choose whether to link inventory: The "Link inventory with original product" checkbox is checked by default. Keep it checked if you want both products to share the same inventory count (recommended for most growers). Uncheck it to create a completely independent copy.
- Click "Clone Product"
- The form will automatically fill with all the product details from your original product
- Adjust the category if needed (products can be in different categories in different markets)
- Click "Create Product" to save
How Shared Inventory Works
When you clone a product with "Link inventory" checked (the default), both products share the same inventory count:
- One Master Product: The original product becomes the "master" that controls inventory
- Linked Products: Cloned products automatically use the master's inventory count
- Shared Quantity: When someone orders from any linked product, the quantity decreases for all of them
- Centralized Updates: Change the quantity on the master product and all linked products update automatically
Example: Selling Tomatoes in Two Markets
Sarah grows Cherokee Purple tomatoes and sells in both Athens Market and Atlanta Market.
- In Athens Market, she creates "Cherokee Purple Tomatoes" with quantity 50
- She notes the copy code shown in edit mode:
12345-67890 - In Atlanta Market, she clicks "Add Product" and pastes the copy code
- She keeps "Link inventory with original product" checked (the default)
- She clicks "Clone Product" - the product is created and linked in one step!
- Now both markets share the same inventory - if Athens customers order 10 tomatoes, Atlanta automatically shows 40 available
- Sarah only needs to update quantity in Athens Market - Atlanta updates automatically
Linking Existing Products
If you already have products in multiple markets and want to link them after the fact, you can do so by editing the product:
- Decide which product will be your "master" (usually your main market)
- Get that master product's copy code
- Go to the other market and edit the product you want to link
- Find the "Master Product Code" field in the product edit form
- Paste the master product's copy code and save
Benefits of Product Linking
- No Double-Selling: Prevents overselling when you have limited inventory across multiple markets
- Single Update Point: Change quantity once on the master product instead of updating each market separately
- Time Savings: Clone products instead of re-entering all details for each market
- Consistency: Keep product descriptions and photos consistent across all your markets
- Flexibility: You can still set different prices or categories per market if needed
Important Notes About Linked Products
- Quantity Control: Only the master product's quantity can be edited. Linked products show but cannot modify the quantity.
- Independence: Products can have different prices, categories, or availability status in different markets
- Unlinking: To unlink a product, simply clear the Master Product Code field and save
- Photos: Product photos are cloned initially but are not automatically synced. Update photos separately in each market if needed.
- Orders: Each market's orders remain separate - only the inventory count is shared
Grower's notes
Every product can have a grower's note attached — a longer, free-form piece of text that shoppers see on the product's detail page below the description. It's the right place for anything that would clutter the short description:
- Growing method details ("started from heirloom seed saved from last year's crop…").
- Storage tips ("keeps two weeks in the fridge; don't wash until you're ready to use").
- Allergen or safety information.
- Recipe suggestions, pairings, or preparation walkthroughs.
- Stories — how you grew it, why it's unusual, what's special about this variety.
The note is written in Markdown — headings, bold/italic, bullet lists, links, blockquotes, and simple tables all work. The platform sanitizes the output, so you can paste from a text editor without worrying about breaking the page. One note per product; edit or delete it any time from the product editor.
Featured products
Featuring a product highlights it in the "Featured" section on the market homepage. It's the single most effective thing a grower can do in-platform to drive sales on a specific item.
- How to feature. Turn on Edit Mode, open the management menu on the product card, and click ⭐ Make Featured.
- Your limit: five per market. If you're already at five and feature a sixth, the oldest featured product is automatically unfeatured (first-in, first-out). No warning, no dialog — the swap just happens.
- Managers can feature more. Managers and superusers can feature any grower's product, up to ten at a time across the market. Their FIFO rule is the same.
- What to feature. Whatever's at peak right now. Rotate as the season moves; featuring something that's out of stock is worse than featuring nothing.
Taking a break: vacation mode
If you need to step away for a week, a month, or a season — travel, illness, a crop gap, anything — there's a Vacation Mode toggle on your grower settings that handles the whole thing cleanly. From the Market Manager or your grower admin page:
- Turning it on deactivates every one of your products at once, so shoppers stop seeing them. Your grower page still exists; you just aren't offering anything.
- Turning it off reactivates every product that still has a quantity greater than zero. Products you'd already sold out of stay inactive; everything else comes back.
- Nothing else is deleted. Photos, descriptions, prices, notes — all kept. Quantities are unchanged. This is the safe way to pause.
Use vacation mode instead of manually deactivating dozens of products — it's faster, safer, and reversible in one click.
Product Performance Analysis
Track how your products are performing to make informed decisions.
Key Metrics to Monitor
- Sales Volume: Which products sell best?
- Customer Feedback: Reviews and repeat purchases
- Seasonal Trends: When do products sell well?
- Price Sensitivity: How does pricing affect sales?
- Inventory Turnover: How quickly do products sell?
Using Performance Data
- Adjust Production: Grow more of what sells well
- Optimize Pricing: Find the sweet spot for each product
- Improve Descriptions: Update listings that aren't performing
- Plan New Products: Introduce items similar to top sellers
- Seasonal Planning: Prepare for predictable demand cycles